
How to Add Multiple Links to Your Instagram Bio for Free
Learn how to add multiple links to your Instagram bio for free, reorder them, and choose between Instagram’s built-in links and a Linklume page.
By Linklume
Want to share your shop, newsletter, and latest video from the same Instagram profile? You can add multiple links to your Instagram bio without paying for another tool. Start with Instagram’s built-in Links section, then decide whether a separate page would help you present more content.
This guide covers both approaches, how to order your links, and what to check when something will not open.
Quick answer: how to add multiple links to Instagram bio
Open the Instagram mobile app and go to Profile → Edit profile → Links → Add external link. Paste a destination URL, add a descriptive title, save, and repeat for your other links.
Instagram supports up to five profile links, a feature introduced in Meta’s Instagram announcement and also described in Linktree’s current setup guide. You do not need Linktree or a paid link-in-bio service to use this native option.
For more destinations or a designed page, add one link to a link-in-bio page instead. The extra destinations live on that page; they do not increase Instagram’s native link limit. The service you choose determines any costs.
How to add multiple links directly in Instagram
Use the Instagram app on your phone. Menu labels and save controls can differ between app versions, so follow the equivalent controls on your screen.
- Open your profile. Tap your profile picture in Instagram.
- Tap Edit profile. Find the Links section.
- Choose Add external link. Paste the full URL, including
https://. - Give the link a clear title. Try “Shop handmade candles,” “Book a consultation,” or “Watch my latest video.”
- Save the link. Use the save, done, or checkmark control shown in your app.
- Add another destination. Return to Links and repeat until you have added the links you need, within Instagram’s limit.
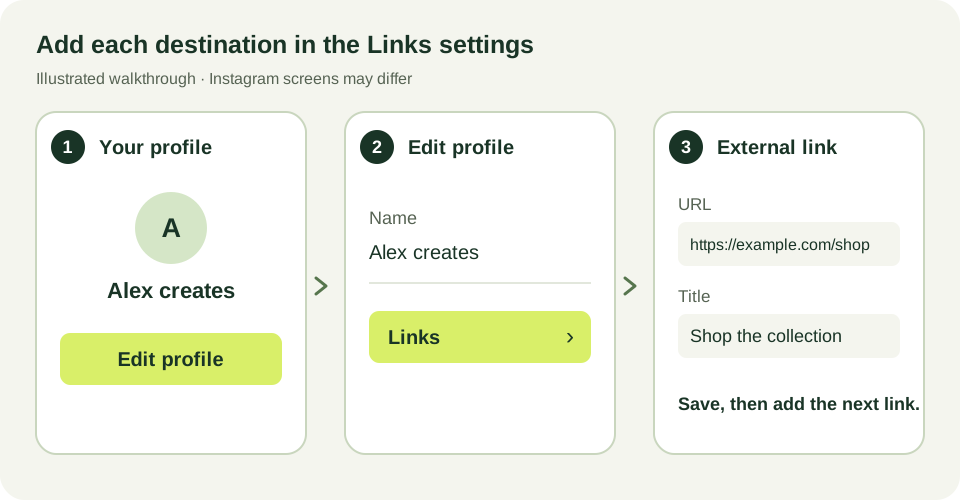
Illustrated walkthrough, not an app screenshot. Your Instagram screens may look different.
Add links in the Links settings rather than pasting several URLs into your written bio. Your bio text explains what you do; the Links section holds the clickable destinations.
Put your most useful link first
Return to Edit profile → Links and look for the menu with Reorder links. Move your priority destination to the top using the drag handles, then save. If the controls look different, check the options available in your version of the app.
For example, put event tickets first during a launch, then move your evergreen shop or booking link back to the top afterward. The first link gets the most prominent placement on your profile; visitors may need to open the link list to see the others.
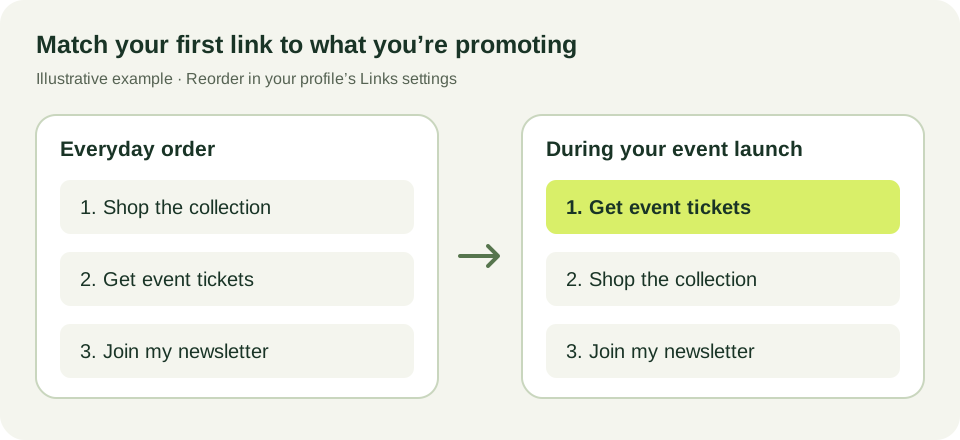
Illustrative link order. Put the destination mentioned in your current content first.
Check the public result
Go back to your profile and open the links as a visitor would. Check the titles, order, and every destination. Where possible, also check from another account or ask someone to open your profile.
A link that works while you are signed into your store or booking service might still require a login for visitors. Use public destination URLs, and check that mobile visitors reach the intended product, video, or booking page.
Instagram links or a link-in-bio page?
Choose based on what visitors need to find. A shop and newsletter may fit comfortably in Instagram’s own list. A creator sharing products, resources, videos, and booking options may prefer a separate page.
| What you need | Instagram’s built-in links | A Linklume page |
|---|---|---|
| A few direct destinations | Add up to five profile links | Add links to a separate page |
| Cost to publish | No separate link-tool subscription | Publishing requires an active subscription |
| Presentation | Instagram’s standard link list | Themes, profile details, and content blocks |
| Updating destinations | Edit your Instagram profile links | Edit your page while keeping its URL in Instagram |
| Reviewing page activity | Check the Insights available for your account | View page and link activity in Linklume’s analytics |
Native links are a useful starting point when your needs are simple. A link page becomes helpful when you want more context, a consistent visual identity, or a destination you can share across several platforms.
Still comparing providers? Read our free link-in-bio tools for Instagram comparison, and check each provider’s current plan details before choosing.
How to add a Linklume page to your Instagram bio
You can create a Linklume account and prepare your page before choosing a subscription. Publishing a live Linklume page currently requires an active subscription. If you want to keep your setup entirely free, use Instagram’s native links above. See current Linklume plans before activating a page.
To use a Linklume page:
- Create your account. Go to Linklume signup and choose an available username. This forms your public page address.
- Choose a template and open your page editor. Add a recognizable display name, profile image, and short description.
- Add your destinations. Use Add, then select a link block. Enter the destination and a useful title for each link.
- Arrange and customize. Drag links into priority order and choose a theme that matches your profile. Start with a small, clear selection.
- Check saving and publishing. Wait for the editor’s Saved status. If your page shows Activate, choose a subscription to enable publishing. If it shows Draft with an active subscription, use that control to make it Live.
- Copy and test your public URL. Use the copy-URL control beside your page address. Open it outside the editor and check every destination.
- Add the URL to Instagram. Return to Edit profile → Links → Add external link, paste your Linklume address, add a title, and save.

An existing Linklume example showing a profile header, social icons, and link blocks. Choose the content and styling that suit your audience.
Copy the public page address rather than a dashboard or editor URL. Your followers should arrive at the live page without signing into Linklume.
Three simple link setups you can adapt
These are illustrative starting points, not measured results. Use destinations you already maintain and label them so visitors know what opens next.
For a creator
- Watch my latest video — the specific video mentioned in your content.
- Get my weekly newsletter — your public signup form.
- Work with me — your collaboration or contact page.
A matching bio invitation could be: “New tutorials every week. Watch the latest one below.”
For a service business
- Book a consultation — your public booking calendar.
- Explore my services — an overview of what you offer.
- Contact me — the best way to ask a question.
If booking is the main goal, send visitors straight to the booking page rather than making them search your homepage.
For an online shop
- Shop the new collection — the collection featured in recent posts.
- Browse bestsellers — a helpful alternative for first-time shoppers.
- Delivery and returns — information customers need before ordering.
Replace expired launches and sold-out product links promptly. For more help with titles and placement, use our guide to getting more clicks from your Instagram bio.
Troubleshooting Instagram bio links
The Links option is missing
Check that you are editing the intended profile in the mobile app, then update Instagram and reopen it. Screens can vary by account and app version. If you still cannot find the setting, check Instagram’s Help section or report the issue through the app.
Instagram rejects my URL
Check for spaces, missing characters, and an incomplete address. Open the full https:// URL in your phone’s browser first. If Instagram blocks a working destination, review the notice and use its support options; changing the address to evade a block is not a fix.
A link opens the wrong page or asks for a login
Copy the public URL again from the destination service. Avoid admin, preview, and account-management addresses. For a Linklume destination, confirm that the page is Live and its subscription is active. Test as a visitor before promoting it.
Frequently asked questions
Can I add two links to my Instagram bio without Linktree?
Yes. Add each destination separately through Edit profile → Links → Add external link. Instagram’s built-in option supports up to five links, so two destinations do not require a separate service.
Can I share more than five destinations?
Yes, by linking to a separate page that contains additional destinations. That page occupies one Instagram link slot. Check your chosen page provider’s link limits and publishing costs.
Why is a URL in my bio text not clickable?
Use the dedicated Links settings for clickable website destinations. Keep the written bio for your description and an invitation explaining what people will find at your links.
Do I have to pay to add multiple Instagram bio links?
No. Use Instagram’s built-in links for the free method. A separate link-page service may charge for publishing or particular features; Linklume currently requires an active subscription to publish.
Start with the destinations your followers need most. If a designed page suits your next step, create your Linklume page and review the publishing plans before going live.
Ready to create your own link in bio page?
Bring your links together with Linklume.